 |
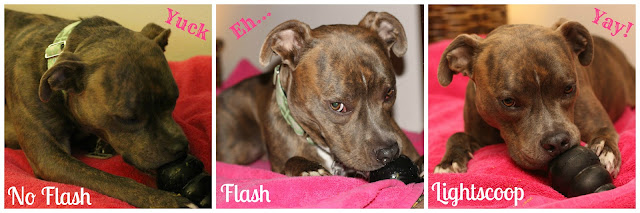
| These photos were taken within 5 minutes of each other, indoors, at night, and are all SOOC |
Since getting our DSLR a few months ago, we have learned so much about photography (though we are by no means experts...just visit
Kate with a Camera,
Love and a Six Foot Leash, and
Peace, Love and Fostering for that). We have captured quite a few wonderful photos of Athena with our new camera, but the good ones always seem to be taken outside in the daylight. Like many DSLR newbies, we've struggled to get good photos indoors, especially in low light settings (like during the evening hours when Athena seems to do the cutest things). But, we think that all of our YouTube video watching and tutorial reading has helped us to figure out the mystery of
how to take good photos of dogs indoors in a low-light setting. Of course we wouldn't want to withhold these secrets from our lovely blog readers, so here's the scoop on how to photograph your dog indoors.
No Flash = Bump up the ISO:
Some of the best advice that we've received while learning how to take better photos has been to
turn off the flash. However, this advice doesn't hold true when taking photos indoors and at night. The above photo was taken with no flash. Because of this, I had to bump up the ISO to the highest possible amount (which for our camera is 6400). The higher the ISO, the lower the quality of the photo (i.e. more noise a.k.a. grain). I HATE grainy photos. I cringe at my own photos that have any hint of graininess to them. Along with being just plain yucky, the above photo also doesn't properly reflect the colors of Athena or her surroundings and is just plain dull.
Flash = Alien Eyes:
For the most part, we never, ever, ever, take any photos of Athena with the flash on. However,
the flash can sometimes be the only option when taking photos indoors with low-light. Buttttttt, did you know that using the flash actually turns your dog into an alien? Yep, it's true. The flash is the culprit behind those pesky green alien eyes that dogs sometimes have in pictures. You can see from the photo above that our dearest Athena is indeed an alien from outer space. She also looks rather bright and a bit too shiny for her own good (you can also see the reflection of the flash on the Kong, and the harsh shadows near Athena's left ear). The flash is definitely an improvement from using no flash indoors at night, but it's not necessarily the best option for getting good photos.
Lightscoop = Bright & Natural:
I first discovered the geniusness of the
Lightscoop from
Kate with a Camera's
post about her favorite camera accessories. In essence, the Lightscoop is a light diffuser that uses the power of the camera's pop-up flash to bounce light off from the ceiling or wall. This creates photos that are soft, natural, and true to color. The Lightscoop is the PERFECT remedy for dark, indoor settings. I used to give up on taking photos of Athena indoors at night because I knew that they would turn out horrible. Now I look forward to our evening photo sessions because the Lightscoop is so quick and easy to use and the photos turn out wayyyyy better than using the flash (or no flast at all).
Here are some other photos that we've taken in the evening, indoors, using our Lightscoop:
So, what exactly is a Lightscoop?
Well my friends, this here is a
Lightscoop. It's simply a plastic thing-a-ma-bob that covers the pop-up flash of your camera to magically bounce light off from a ceiling or wall using a mirror. To be honest, the Lightscoop is quite large and bulky, but it does it's job really well. It's also not meant for our version of camera (Canon Rebel T3i), so I had to do some internet research to figure out how to get it to work properly on our camera (I'd be more than happy to assist you in this department if you would like). Overall, I have been extremely happy with this $30 camera accessory, because let's be honest, the only real reason we got the camera in the first place was to take pictures of Athena, so the pictures better be good!
 |
| B modeling the use of the Lightscoop |
No Lightscoop? No problem!
Before receiving the Lightscoop for Christmas, I was using a couple of different homemade light diffuser ideas curtesy of my Pinterest photography board. The pictures that I took using these diffusers did come out nicely, especially compared to the flash and no flash versions. So, if you're not quite ready to commit to the Lightscoop, you may want to see if you like a light diffuser first. Here's a list of very high-tech diffusers that will do the job:
- White plastic shopping bag (pop up the flash and cover with the bag)
- White business card (see the link for a how-to)
- White sock (pop up the flash and cover with the sock)
If you're looking to get better at photography, or if you're unsure of some of the terminology used in this post, check out
this video on the basics of exposure and photography, a great introduction to taking photos indoors and in low-light settings.
Do you have any of your own tips for photographing dogs indoors? Do you have any "dog specific" photography questions that you'd like us to tackle? Let us know!


